What Happened in Recent Days - A LOT

Over the past few weeks, I’ve been on an intensive learning journey exploring automation, cloud deployment, and AI integration. I’ve been hands-on, building real workflows and connecting actual services. Here’s what I discovered along the way.

Getting Started with Automation

The foundation of this exploration was deploying n8n as a self-hosted instance on a cloud provider. This wasn’t just about clicking a button—it required understanding infrastructure, configuration, and the basics of running a service in the cloud. Once that was in place, I could start building workflows.

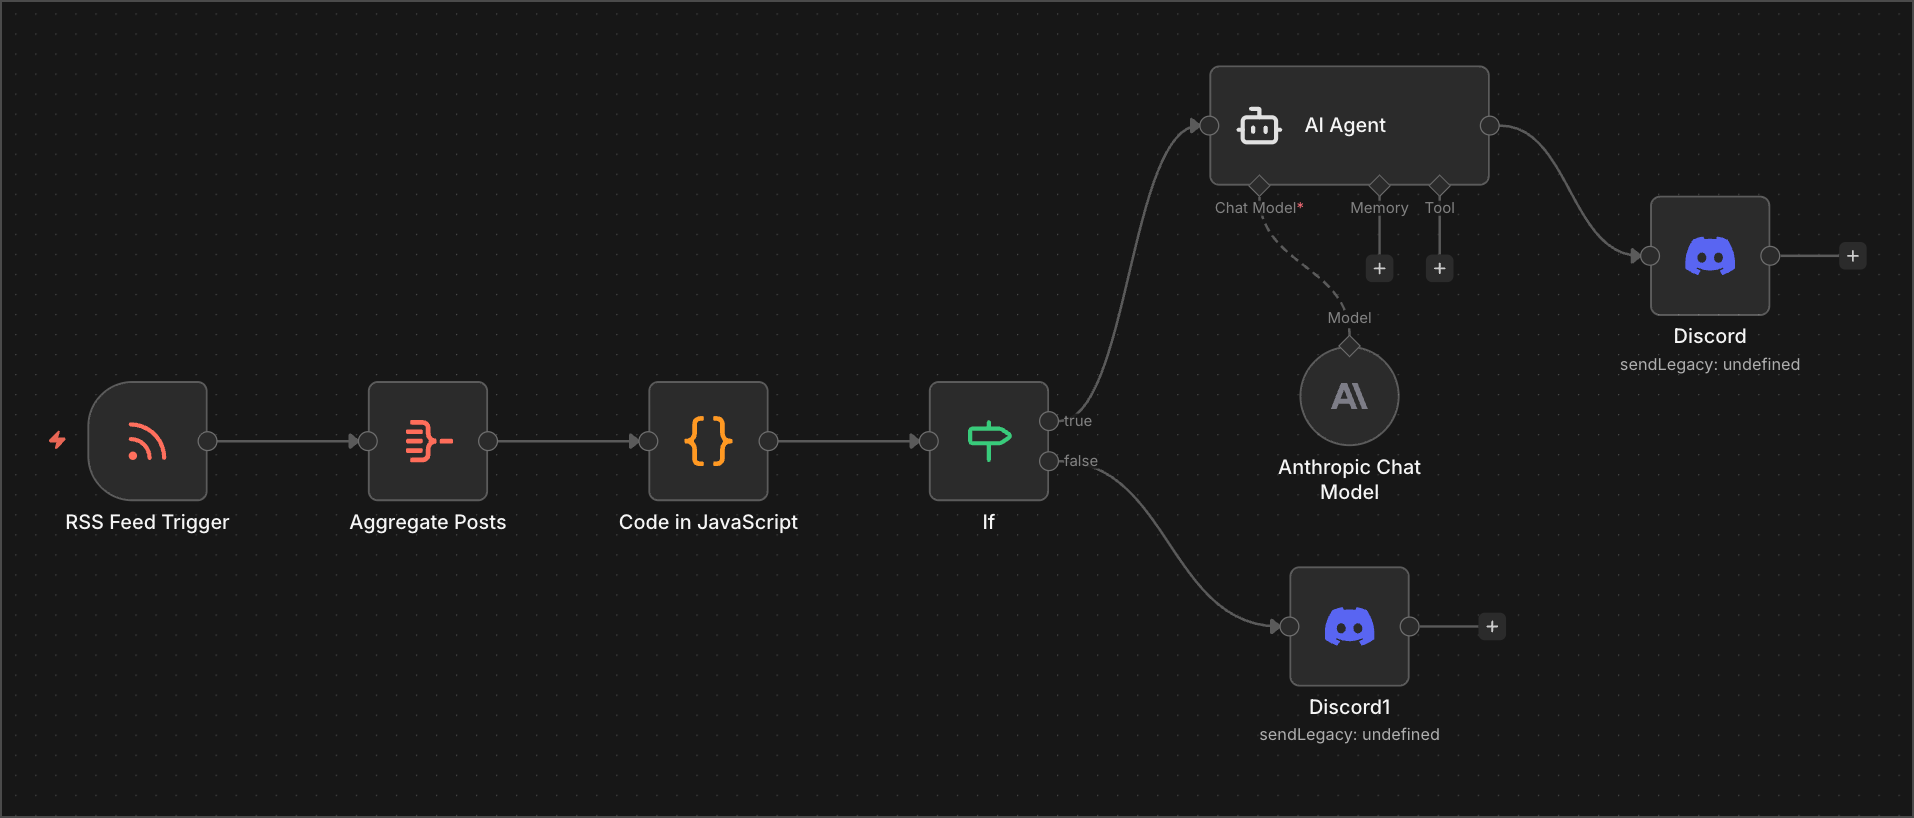
Building basic workflows in n8n taught me what it actually means to create a functional automation. It’s not enough to have a good idea; you need to understand how data flows through your workflow, how triggers initiate actions, how conditions branch logic, and how errors are handled. Meeting all the requirements for a working workflow meant learning to think systematically about each step and its dependencies.

Accelerating Learning with AI

One of the biggest breakthroughs was leveraging Claude AI to accelerate my learning across different subject matters. Rather than struggling through documentation alone or spending hours debugging, I could ask targeted questions and get explanations tailored to my specific use cases. This fundamentally changed how quickly I could iterate and experiment.

Claude became my learning partner—helping me understand concepts, troubleshoot issues, and even write code. This wasn’t just about saving time; it was about compressing what might have taken weeks of traditional learning into days of focused experimentation.

Building and Connecting

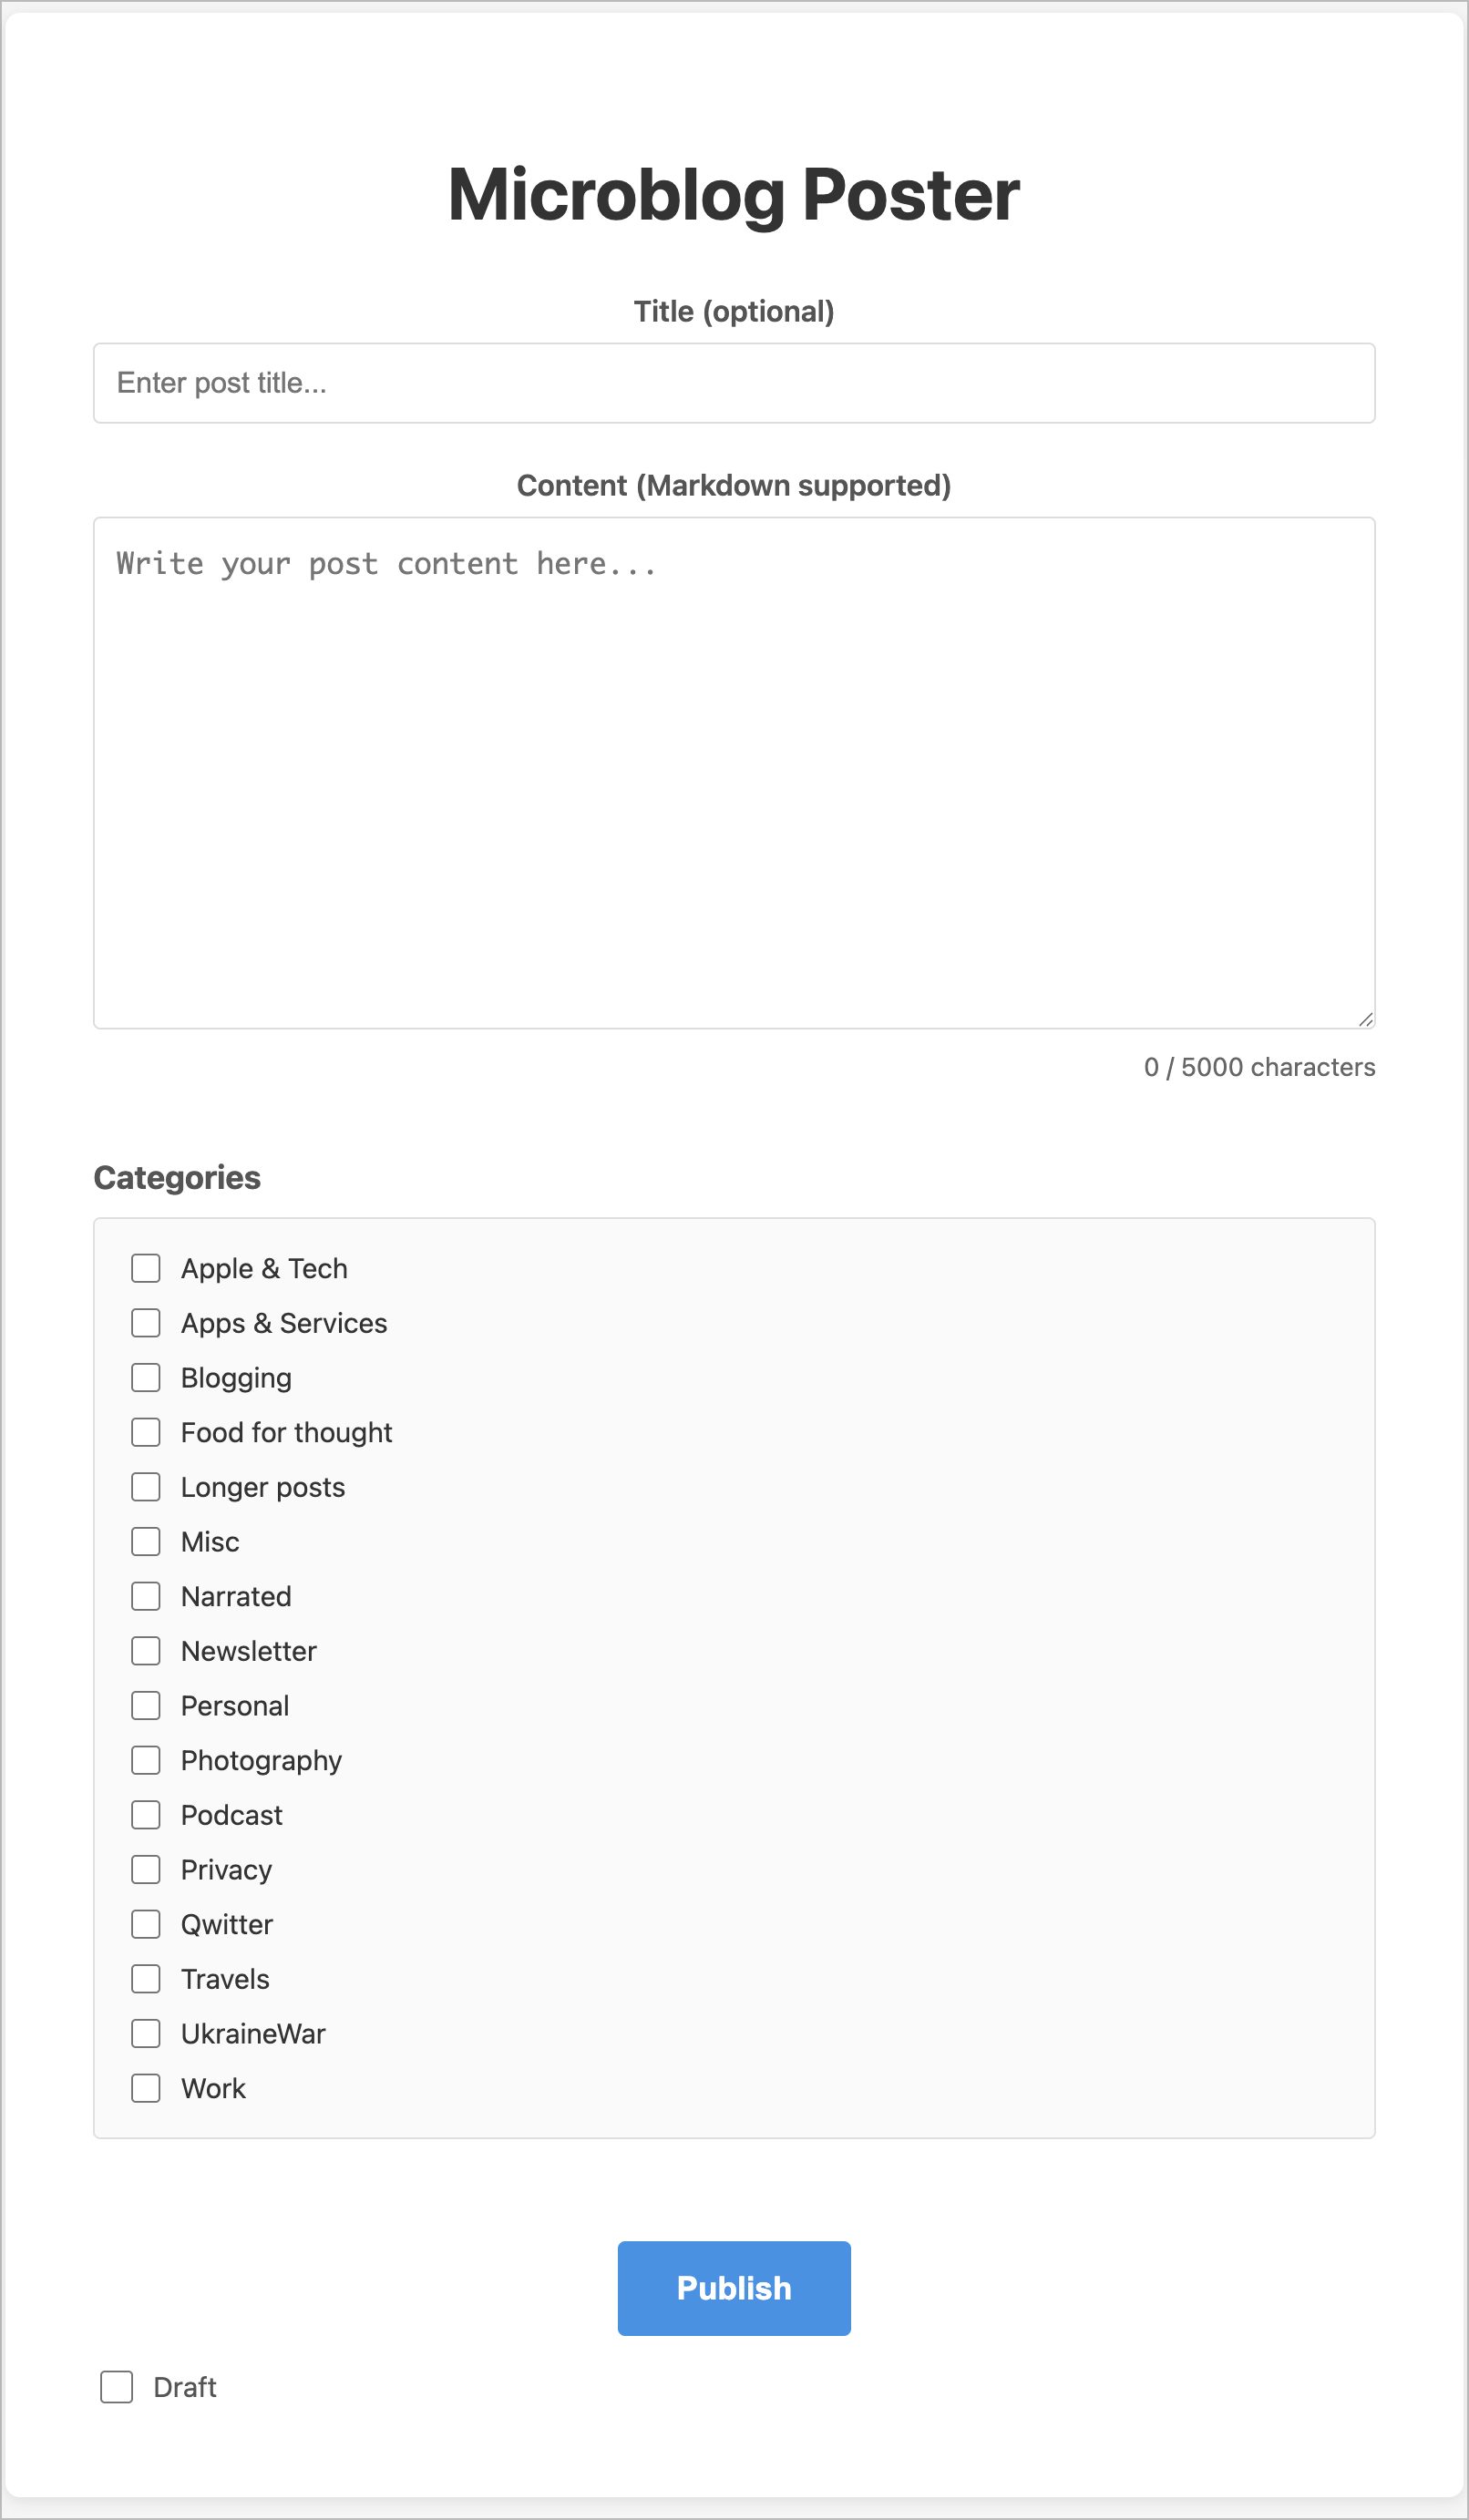
From there, I expanded into multiple directions simultaneously. I deployed Next.js apps on Vercel using Claude Code, which gave me a way to build custom web interfaces quickly. I integrated GitHub for continuous delivery, automating the process of pushing code changes to live services like Scribbles and Micro.blog.

But the real power came from connecting external services directly into n8n workflows. I learned to interact with Telegram, Discord, Micro.blog, and Tinylytics through their APIs, webhooks, and HTTP requests. Each integration taught me something different about how modern services communicate with each other. Some services have well-documented APIs; others require reverse-engineering their webhook payloads. Some are straightforward; others have quirks you only discover through experimentation.

The Deeper Challenges

The more complex problems emerged when I tackled data persistence and LLM integration within n8n. Adding state management to automation workflows isn’t trivial—you need to decide where to store data, how to retrieve it, and how to keep it synchronized across multiple workflow runs. It’s one thing to run a workflow once; it’s another to run it reliably over time while maintaining context and history.

Incorporating AI services—whether through pay-per-use models like Claude or subscription-based services—required careful consideration. I had to think about cost implications, rate limits, and how to structure requests efficiently. Suddenly, every API call had a price tag, and I became much more conscious of resource consumption.

Key Insights

What stands out most is a clearer understanding of tool selection. Each platform has its place, and knowing when to use n8n versus a custom Next.js app versus a direct API call makes all the difference. Sometimes the right answer is a simple webhook; sometimes you need the flexibility of a full application. This contextual thinking has become invaluable.

I’ve also learned to transpose ideas into concrete use cases, leveraging service APIs from Scribbles, Tinylytics, and Micro.blog in ways I hadn’t considered before. What started as “I wonder if I can connect these services” became “Here’s a specific workflow that solves a real problem.”

I’ve discovered how to make the most of services I was already depending on—Micro.blog and Inoreader—by understanding their capabilities more deeply. These tools had features and integrations I’d overlooked, and now I’m using them in ways that actually enhance my workflow.

I’ve also expanded my toolkit with utilities like VS Code, GitHub, and Postman, each playing a crucial role in different parts of the workflow. VS Code became my development environment, GitHub my version control and deployment trigger, and Postman my tool for testing and understanding APIs before integrating them into n8n.

The Bigger Picture

The journey has been about understanding not just individual tools, but how they fit together in a larger ecosystem. It’s about recognizing that modern development isn’t about mastering one tool—it’s about understanding how to orchestrate multiple tools to solve real problems. And it’s about using AI not as a replacement for learning, but as an accelerant that lets you learn faster and go deeper.

Building an Automated Publishing Pipeline: From Craft to Ghost

For months, I’ve been publishing my weekly newsletter, The Ephemeral Scrapbook, using a manual process: write in Craft, export to Ulysses, copy to Ghost, reformat everything, add images, fix formatting issues, and finally publish. It worked, but it was tedious and time-consuming.

Today, that process is fully automated. Here’s how Claude and I built it together.

The Challenge

My workflow had become a bottleneck:

  • Writing newsletters in Craft Docs (my preferred writing environment)
  • Exporting to Ulysses as an intermediary step
  • Manual copy/paste to Ghost (my publishing platform)
  • Reformatting all the markdown and HTML
  • Dealing with Craft-specific formatting that Ghost didn’t understand
  • Adding metadata like excerpts and tags manually

I wanted automation, but I also wanted to understand the infrastructure I was building. That’s where working with Claude became invaluable—not just executing commands, but learning and iterating together.

The Solution: n8n Workflow Automation

We decided to build an n8n workflow that would:

  1. Search for a document in Craft by title
  2. Fetch all the content blocks
  3. Transform Craft’s markdown/blocks into clean HTML
  4. Publish to Ghost as a draft
  5. Return confirmation with the post URL

Simple in concept, complex in execution.

The Journey: Key Milestones

Milestone 1: Understanding the Architecture

Challenge: Should we use multiple workflows or one unified workflow?

Decision: One end-to-end workflow that handles everything from search to publish.

Learning: Simplicity wins. Rather than orchestrating multiple workflows, we built one cohesive pipeline that’s easier to debug and maintain.

Workflow nodes:

  • Webhook (trigger)
  • HTTP Request (search Craft)
  • HTTP Request (fetch document)
  • Code (transform to HTML)
  • HTTP Request (publish to Ghost)
  • Respond to Webhook

The Iterative Building Process

One of the most important decisions we made was to build and test incrementally. Rather than assembling the entire workflow at once and hoping it would work, we added one node at a time, testing after each addition.

The Testing Cadence:

  1. Add Webhook → Test: Confirmed the webhook received the query parameter correctly
  2. Add Search Node → Test: Verified we could find the document and get the correct document ID
  3. Add Fetch Node → Test: Checked that we retrieved all 54 blocks of content with the proper nested structure
  4. Add Code Node → Test: Validated the HTML transformation, checking for clean output without Craft tags
  5. Add Ghost Publish Node → Test: Ensured the post was created as a draft with all content intact
  6. Add Response Node → Test: Confirmed the workflow returned post details back to Claude

Why This Mattered:

Each test revealed issues that would have been much harder to debug in a complete workflow:

  • The search node helped us understand Craft returns multiple matches (we needed the first result)
  • The fetch node showed us the nested structure (parent document → edition page → content blocks)
  • The code node iterations caught formatting issues (<callout> tags, ## symbols, <highlight> tags)
  • The Ghost publish node revealed we needed the ?source=html query parameter

By testing at each step, we could pinpoint exactly where problems occurred. When something didn’t work, we knew it was the node we just added, not some mysterious interaction between distant parts of the workflow.

This incremental approach turned what could have been hours of debugging into a smooth building process. Each successful test gave us confidence to move forward, and each failure was easy to isolate and fix.

Milestone 2: Building the HTML Transformer

Challenge: Craft uses its own markdown dialect with special tags like <callout>, <highlight color="blue">, and markdown headers in text blocks.

What we built: A comprehensive JavaScript transformation engine that:

  • Removes Craft-specific tags (<callout>, <highlight>)
  • Converts markdown formatting (bold, italic, links, code)
  • Processes different block types (text, headers, quotes, code, images, videos)
  • Handles rich URL blocks (YouTube embeds)
  • Preserves anchor links for internal navigation
  • Generates proper HTML for Ghost’s Lexical editor

Key functions:

  • markdownToHtml() - Converts inline markdown to HTML
  • processBlock() - Handles each block type (text, image, richUrl, code, line, etc.)

Milestone 3: Testing and Validation

The Process:

  • Test with real content (Edition 2025-52 with 54 blocks)
  • Verify HTML output in Ghost’s editor
  • Check for Craft formatting artifacts
  • Confirm all sections, videos, quotes, and images are preserved

Quality Checks:

  • ✅ No <callout> tags
  • ✅ No <highlight> tags
  • ✅ No ## symbols in headers
  • ✅ All YouTube videos embedded correctly
  • ✅ Blockquotes formatted properly
  • ✅ Images included
  • ✅ 9-minute reading time (17,000+ characters)

The Final Workflow

Input: {"query": "The Ephemeral Scrapbook — Edition 2025-52"}

Output: Draft post in Ghost with:

  • Complete HTML content
  • All formatting preserved
  • Clean structure
  • Ready for manual review (add images, tags, excerpt)

Execution time: ~3-4 seconds total

  • Search: 1-2 seconds
  • Fetch: 1-2 seconds
  • Transform: 36-84ms
  • Publish: 600-900ms

The Tools

  • Craft: My writing environment with a powerful API
  • Ghost: My publishing platform with a robust Admin API
  • n8n: Workflow automation platform (self-hosted on DigitalOcean)
  • Claude AI: My pair-programming partner via MCP (Model Context Protocol)

The Result

The workflow is production-ready. My publishing workflow went from 20+ minutes of manual work through Craft, Ulysses, and Ghost to a single command:

“Claude, publish Edition 2026-01 to Ghost”

And it just works. 🎉

Why I Built a Micro.blog Front End?

As recently shared on my blog, I have finished (or mostly finished1) building a simple front end for Micro.blog. This front end, as depicted in the following screenshot, presents the user with a straightforward UI: a title field, a body field, blog post categories, and a Publish button—very focused, with no distractions. It works on desktops and mobile devices. I even added PWA support. But why did I build this?

First, I wanted to dip my toes into Vercel. I’ve recently stumbled upon many posts about web apps built and deployed on Vercel by people claiming no programming experience. Most people were using Claude AI or Claude Code to describe their app and deploy it to Vercel. Some apps were impressively designed and functional. Yet, I thought it wasn’t that easy and required a lot of technical knowledge. I was intrigued. I was “mostly” wrong.

I’ve been using Claude AI since mid-December, in conversational mode, for different tasks, including getting explanations on building apps on Vercel and other platforms. I’ve been looking for small project ideas since then. Building a simple front-end to Micro.blog quickly became the perfect test. Micro.blog offers a simple API for many things. Using Claude and the API documentation, I asked Claude AI whether it was possible to build a simple UI for posting on Micro.blog. Sure enough, it was. My initial prompt describing the envisioned app follows:

Let’s build a web app hosted on Vercel that lets me to write blog posts for Micro.blog. The form will include only two text fields: a blog post title and the blog post text itself. Include a character count that will update as I type. Maximum of 5000 characters. The web page should include a title “Microblog Poster", centered.

Micro.blog supports Markdown, so the blog post text field should support it too.

The authorization token should be stored in an environment variable named “microblog_token” which I will provide once the project is created on Vercel.

I will use a GitHub repo, which should be named after the application name: “(redacted)” where the app will use the full URL: https://(redacted)

Provided that Micro.blog supports draft posts as exposed in the Micro.blog APIs, a toggle named “Draft” should be on the web form and be off by default. When enabled, this means I can send the blog post to Micro.blog but with a draft status. Otherwise, the blog post is published.

The initial state of the web app is to list all available blog post categories as a series of checkboxes, all off by default. You will need to retrieve possible blog post categories during the initialization phase. A blog post can have more than one category selected or none. This list of checkboxes should be left-aligned. The category list should be saved in the browser’s local storage and initialized on the first invocation of the web app.

The form will contain a button “Publish” centered horizontally (like all the other UI elements, except the toggle underneath the Publish button which should be left aligned. Once clicked, if the post operation is successful, add a small banner (centered) telling me the operation was successful with an appropriate message.

For a non-draft post, after hitting Publish, the form should display a clickable link to the blog post’s final URL. For the draft post, you should display the clickable link to the draft post instead.

Images or any other attachments are not needed.

You can look at micro.blog API documentation in the following URLs:

For reading data from Micro.blog service: https://help.micro.blog/t/json-api/97

For posting to Micro.blog service: https://help.micro.blog/2017/api-posting/

After a few hiccups and errors, it eventually worked. I had to install GitHub Desktop on My Mac as well as Visual Source Code, but I eventually realized Claude AI wasn’t optimal. I ultimately switched to Claude Code to iterate on the initial release. My experience was so much smoother. I do experience so weird issues with GitHub, but it seems without impacts on the deployment.

So, building the app requires a GitHub repository for holding the source code. Vercel connects to my GitHub repo, and as soon as a new commit is made, a new app deployment happens; It’s all automatic. One important thing to know: a project environment variable2 to hold the Micro.blog app token is needed before trying the app for the first time.

My first try mainly worked as expected. I made sure to have a draft mode available in the UI so that I don’t mess up my timeline with test posts. Once the app is deployed and available for use, any modifications are made through prompting Claude Code on my local machine. Code changes are pushed to GitHub on demand. It takes a few minutes for a new iteration to be available for testing.

If you have any questions or comments, feel free to post them, and I’ll do my best to answer them to the best of my knowledge.

One more thing: Vercel is free to use in my case because my app is relatively lightweight. Lastly, one benefit of building my app is that it will circumvent a design issue with Micro.blog’s post editor on the web: the title field and categories aren’t listed by default. I find this to be annoying. My app shows them. I’m happy with that.


  1. Software is never finished! ↩︎

  2. It’s the most secure way to keep that token away from unauthorized eyes. ↩︎

From My RSS Feeds To Day One

Recent readings about n8n and with the help of Claude AI, I finally found a way to replace IFTTT for archiving my RSS feeds content: it won’t be by using an n8n automation but a simple feature that was sitting right in front of my eyes on Micro.blog: cross-posting. The trick is simple: each of my RSS feed is added to the Sources panel in Micro.blog, from there, I configure cross-post the RSS feed article to other places like Day One journal using email-to-dayone. Voilà. I’ll be closing my IFTTT account later today after so many years of service. The only rather big downside: Micro.blog doesn’t copy images from the source into Day One while IFTTT could. 🫤

Update #1: I submitted my issue on the Micro.blog help forum, and a few hours later, a fix was on the way. Thanks @manton

Update #2: And now it is available; photos are now supported, too! Thanks to Manton!

Using AI For Writing is Lazy? Think Again

Some believe that using AI for writing articles is lazy, not creative, and that you don’t earn the credit for doing it. I disagree. Or, it depends. Here’s a personal experiment.

This week, I shared an article about digital sovereignty with my professional network on LinkedIn. Even if I used ChatGPT to write the article, I spent days on it, or, more specifically, I spent days creating and testing different prompts. The article was written in French, then later translated into English and shared on my blog (see “On Digital Sovereignty and Strategic Realism”).

In this meta blog post, I want to share the final prompt that led to the article. Please note that the final response from ChatGPT was manually modified before being posted. Here’s the prompt below followed with some comments.

I would like you to write an article of no more than 1500 words on the topic of digital sovereignty, a subject that is currently highly relevant both in Québec and around the world. This article will be read by information technology and cybersecurity professionals. It should offer a clear-eyed perspective on the issues and challenges related to the pursuit of digital sovereignty for organizations and governments. The article should not be alarmist, but realistic and critical, with the goal of prompting reflection among readers.

Here is how the article should be structured: an introductory section that provides context, followed by a section explaining why digital sovereignty is essential but not a fully realistic target in absolute terms; we must remain pragmatic. Then, a section offering potential solutions or realistic strategies that large organizations should adopt, especially if they are critical to society.

The article should conclude with open questions inviting readers to reflect and comment in order to spark a constructive conversation. Use the following elements to build the article. Reuse the provided links as references.

  • Over the past five years, a series of international, political, and technological events has forced us to examine the notion of digital sovereignty (a few examples: the rise of the GAFAM giants, the Snowden affair, the U.S. Patriot Act and Cloud Act, recent U.S. elections, mergers and acquisitions in the tech sector, etc.).
  • What exactly is digital sovereignty? “Digital sovereignty refers to the ability of a state, an organization, or an individual to control and manage its data, digital infrastructures, and technologies in order to ensure its strategic autonomy and security in the digital space.”
  • It is the ability to fully exercise one’s rights and choices in the digital domain without being subject to external constraints.
  • Major outages from several cloud service providers have occurred, the most notable being:
  • AWS (October 20, 2025: Revealing the Cascading Impacts of the AWS Outage – Ookla)
  • A Microsoft Azure outage (October 29, 2025: Microsoft Azure Outage: How the World’s Second-Largest Cloud Platform Went Down – ThinkCloudly)
  • And more recently, a Cloudflare outage (November 18, 2025: Cloudflare outage on November 18, 2025)
  • Another outage occurred last year, on July 19, 2024, when a problematic update from CrowdStrike caused widespread service failures (2024 CrowdStrike-related IT outages – Wikipedia)
  • These outages strongly remind us of our deep dependence on cloud services and technology in general, both personally and within organizations.
  • We need to reflect and attempt to find viable answers and strategies to these questions: Are we well prepared? Do mitigation solutions exist? Is digital sovereignty only about data?
  • Is digital sovereignty a mirage? Are we not always dependent on something beyond our control? We must keep in mind that:
  • Complexity and cost: Developing sovereign solutions (cloud, software, artificial intelligence) requires massive investments.
  • Global interdependence: Digital value chains are globalized, making total autonomy difficult, if not impossible.
  • Risk of protectionism: Some fear that digital sovereignty could be used as a pretext for trade barriers.
  • Clearly, digital sovereignty is not merely about using or not using cloud computing, or choosing which cloud to use; it is much broader than that.
  • I really like this quote, and it must be integrated into the article: “Digital sovereignty is neither a luxury nor a technological gimmick. It is a pillar of resilience and democracy.” — Le Devoir: https://www.ledevoir.com/opinion/chroniques/936699/parlons-souverainete
  • I believe we need to accept the fact that we will never have full control over our digital destiny. Therefore, we must adopt mitigation and exit strategies to reduce dependency links.
  • We must maintain a message of independence toward major industry players so that they understand they are not alone, even if they are powerful. We need to be strategic, give ourselves the means to stay agile, and diversify.

As you can see, the prompt is nearly as long as the final product. It took me a dozen tries to see what ChatGPT could create. After each try, I would modify and add instructions to the prompt. Oh, and I searched for references myself. In short, this was a multi-day effort. Am I a lazy guy? You tell me.

My Content Creation Ecosystem - Fall 2025 Update

It has been a while since my last update in March 2025. Here’s a summary of the changes.

  • I removed Brief.news because I no longer think it will replace Mailbrew.
  • I removed Mailbrew because I no longer depend on it to consume Internet content. I tried to replace it with Inoreader email digests, but it didn’t work as I wrote here.
  • I decided to add ChatGPT Atlas because I now have a solid use case for it: articles summarization and analysis, as I explained in this YouTube video. This means Perplexity didn’t stay from my previous update. I’m focusing and want to settle on OpenAI for the foreseeable future.
  • My new personal landing page, which is mostly complete, has replaced the one previously hosted on Craft public documents.
  • I also made several visual tweaks to make it cleaner and more visually appealing.

The pace of updates slowed considerably in the last two years. It’s a good thing, and it means I can focus more on content and less on tooling.

Screenflow + Screen Studio

This week, I decided to add Screen Studio to my YouTube recording workflow. Screen Studio brings simplicity for recording more dynamic screen sequences. Everything Screen Studio does can be done in ScreenFlow, but it requires significantly more manual work. But Screen Studio has a severe limitation: we cannot merge recorded sequences. That’s why I’m keeping ScreenFlow.

In summary, my workflow proceeds as follows: individual sequences are recorded in Screen Studio, exported as .mp4 files, and then imported into ScreenFlow to be assembled into a complete video sequence, which includes the intro and outro sequences with background music. Chapter markers are also added in ScreenFlow before final export. Finally, video subtitles are created using Whisper Transcription and exported as an .srt file, which is compatible with YouTube Studio.

Overall, I do spend more time on video rendering, but I think it’s worth it. Lastly, disk space consumption is way higher than before, with 2x-3x more space consumed than with ScreenFlow alone. Ouch.

One more thing: Screen Studio is the only app that makes the M4 Mac mini fan run at full speed. I wonder if Screen Studio uses Apple Metal technology?